|
Building the Starboard Side
Creating the Sheer
Improving the Scuppers
Cutting the Hawse Pipe Openings
Installing the Hawse Pipes
Building the Stern Bulwark
Fitting the Stern Caprail
Building the
Port Bulwark
Building the
Caprails
Building Bulwarks Part 2
I have owned my Bristol 29 for 21 years now, and have studied her lines,
especially her sheer a lot. Since I sail offshore and singlehanded, I've
always felt the biggest safely flaw in her design was a lack of bulwarks.
For me the cute little teak toerail, one inch tall doesn't cut it. So for
this refit I have decided to improve her sheer and build bulwarks
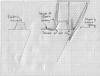
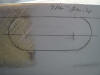
This is a
cross section of the idea.
-
On top
of the original toerail is a board (teak at the areas of the hawse
pipes, closed cell Styrofoam elsewhere) the width of the toerail and
glued to it.
-
Outside is another board of teak or foam that varies in width and taper
in order to extend the angle of the topsides. Thus at the bow, as shown
in the drawing, the bulwark will be considerably wider than as if
follows aft. The teak areas where the hawse pipes need reinforcement
will be secured through the teak board, through the toerail and the hull
to deck joint with long carriage bolts.
-
The
boards on each side are covered in layers of biax and cloth in epoxy.
-
The
insides and outsides are faired smooth and painted.
-
A 1"
thick teak caprail finishes off the bulwarks.
The sheer
will be trimmed so that at the bow the bulwarks are about 5" tall, dropping
to about 3" at amidships, and about 3-1/2" at the stern. I haven't figured
out how to handle the taffrail yet but I think it will be open for about 3
inches on each side adjoining the bulwarks, for deck drainage and for space
to mount some serious fairleads.
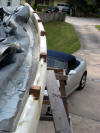
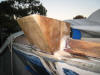
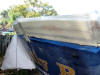
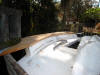
Building the Starboard Bulwark
 This
past weekend I built the scaffolding I will need to start work on the
bulwarks. It ain't pretty but it's solid. This
past weekend I built the scaffolding I will need to start work on the
bulwarks. It ain't pretty but it's solid.
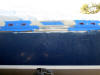
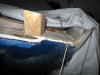
 Today
I initially ground down thru the gelcoat on the starboard deck and topsides
and began shaping a recess to glass into for the bulwarks. The gelcoat was
cut back to the cove stripe and about 4 inches in from the toerail on the
deck. I will epoxy glass to about two inches down and two inches in. Today
I initially ground down thru the gelcoat on the starboard deck and topsides
and began shaping a recess to glass into for the bulwarks. The gelcoat was
cut back to the cove stripe and about 4 inches in from the toerail on the
deck. I will epoxy glass to about two inches down and two inches in.
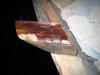
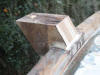
 Then,
I fashioned the bow and mid-beam sections of the bulwarks where the hawse
pipes will be located. In the bow, mid-beam and stern sections of the
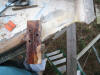
bulwarks I will use teak. This is the bow section, about 16" long by 5-1/2"
tall and 2" wide. It is positioned in thickened epoxy. After the epoxy set
up, I thru-bolted it at the front and back with 5/16" carriage bolts. Then,
I fashioned the bow and mid-beam sections of the bulwarks where the hawse
pipes will be located. In the bow, mid-beam and stern sections of the
bulwarks I will use teak. This is the bow section, about 16" long by 5-1/2"
tall and 2" wide. It is positioned in thickened epoxy. After the epoxy set
up, I thru-bolted it at the front and back with 5/16" carriage bolts.
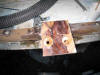
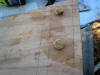
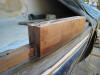 I
did the same design at the mid beam point. Two pieces of teak about 3-1/2"
by 16" glued and then thru-bolted. I
did the same design at the mid beam point. Two pieces of teak about 3-1/2"
by 16" glued and then thru-bolted.
 Next,
I cut the scuppers for the bulwarks. Two on each side of the mid-beam hawse
pipe, each 3" inches wide by 1 inch high. Next,
I cut the scuppers for the bulwarks. Two on each side of the mid-beam hawse
pipe, each 3" inches wide by 1 inch high.
 I
cleaned out the seam between at the hull to deck joint, washed it in acetone
and filled it with thickened epoxy. I added two coats of unthickened epoxy
to the edges of the teak and the area of the deck as well. I
cleaned out the seam between at the hull to deck joint, washed it in acetone
and filled it with thickened epoxy. I added two coats of unthickened epoxy
to the edges of the teak and the area of the deck as well.
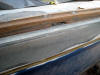
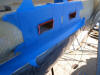
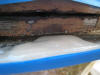
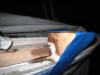
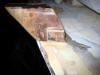
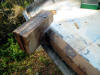
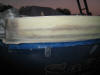
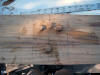
 Here
is the scupper taking shape--still needs some fine sanding and shaping. Here
is the scupper taking shape--still needs some fine sanding and shaping.
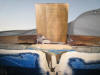
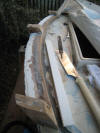
 For
the sections of the bulwarks between the teak hawse pipe areas I will use
Styrofoam. I bought 4 x 8 ft 2" thick slabs at Lowes, For
the sections of the bulwarks between the teak hawse pipe areas I will use
Styrofoam. I bought 4 x 8 ft 2" thick slabs at Lowes,
 and
these I cut on my table saw to the dimensions I need. I rabbited the bottom
face to account for the size of the toerail. I positioned it place and
used lag bolts and fender washers to hold it in place temporarily. Then, I
painted the and
these I cut on my table saw to the dimensions I need. I rabbited the bottom
face to account for the size of the toerail. I positioned it place and
used lag bolts and fender washers to hold it in place temporarily. Then, I
painted the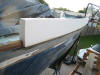 toe rail and the Styrofoam with unthickened epoxy, buttered up both surfaces
with thickened epoxy, and screwed the lag bolts down to position it and hold
it until the epoxy set up. Later I removed the lag bots.
toe rail and the Styrofoam with unthickened epoxy, buttered up both surfaces
with thickened epoxy, and screwed the lag bolts down to position it and hold
it until the epoxy set up. Later I removed the lag bots.
The
interesting thing about Styrofoam is that you can handle it like wood: cut
it with hand saws or electric saws, sand it, shape it with a rasp, drill it.
It makes a million little loose beads that have to be vacuumed up but it's
very forgiving to work with.
After
installing the Styrofoam between the teak hawse pipe bracing, I added two
layers of biax on each side.
 Then
I installed teak braces every 24 inches that are glued in thickened epoxy, tying
the deck, toerail, and hull together. The 2" square teak posts give the foam
tremendous strength and provide strong points for me to screw the cap rail
to the bulwarks. To add the posts, I cut out a section of the foam slightly
larger, Then
I installed teak braces every 24 inches that are glued in thickened epoxy, tying
the deck, toerail, and hull together. The 2" square teak posts give the foam
tremendous strength and provide strong points for me to screw the cap rail
to the bulwarks. To add the posts, I cut out a section of the foam slightly
larger,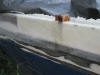 cleaning away all the foam that stuck to the teak of the toerail and the
hull to deck joint. Then I painted the area heavily with unthickened epoxy,
then filled the cavity about a third full of thickened epoxy and pressed the
teak post into the mush, being careful to get a good seat without any air
pockets. Once it is all cured and hard, I will trim the bulwarks to the curve
of the sheer I want.
cleaning away all the foam that stuck to the teak of the toerail and the
hull to deck joint. Then I painted the area heavily with unthickened epoxy,
then filled the cavity about a third full of thickened epoxy and pressed the
teak post into the mush, being careful to get a good seat without any air
pockets. Once it is all cured and hard, I will trim the bulwarks to the curve
of the sheer I want.
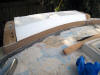
Today I
added a second layer of 24 oz biax to the outside of the bulwarks, giving me
two layers on each side. When the epoxy was still tacky I mixed several
batches fairing mix with microballons and faired over the biax and the
bottom edge against the hull. When it thoroughly hardened, I went after it
with my Festool Rotex 150 with 50 grit Saphir abrasive. The Festool took it
all down smooth in about 20 minutes of dust-free work. While the 150 is
certainly the most expensive sander of its kind in the world, it continues
to prove itself to also be worth every penny it cost.
Creating the Sheer
The sheer
of the bulwarks will be as follows: from the bow going aft 10 ft the
reduction will be 1/4" per foot. Then leveling off at 3 inches for about 10
ft and finally increasing to 3-1/2" at the stern. After I add a layer of
biax to the inside of the bulwarks I will screw a batten to the inside
to establish the correct sheer and use a skill saw to cut the teak and foam.
I screwed the batten to the outside instead.
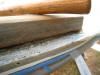
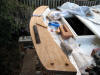
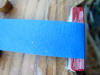
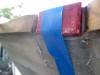
 The
first step was to measure and mark the sheer carefully and align painter's tape
to the marks. I gauged it by eye like this photo and adjusted it several
times until it just looked right to me. Then, I bought some 8' lengths of
molding at Lowes. The molding seemed very consistent and offered a clear straight
edge. The
first step was to measure and mark the sheer carefully and align painter's tape
to the marks. I gauged it by eye like this photo and adjusted it several
times until it just looked right to me. Then, I bought some 8' lengths of
molding at Lowes. The molding seemed very consistent and offered a clear straight
edge.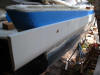 I measured down from the top edge of the tape 1-1/2" (the inset
measurement for the
skill saw blade) and screwed the molding to the bulwark. Finally when it
established the
I measured down from the top edge of the tape 1-1/2" (the inset
measurement for the
skill saw blade) and screwed the molding to the bulwark. Finally when it
established the
 exact
line I wanted, I took my Bosch skill saw, and using the top edge of the
molding as a fence and guide, cut the top of the bulwark to the sheer
measurement. This weekend, I will add two layers of 6 oz fiberglass tape to
the top of the bulwark and finish faring and sanding. exact
line I wanted, I took my Bosch skill saw, and using the top edge of the
molding as a fence and guide, cut the top of the bulwark to the sheer
measurement. This weekend, I will add two layers of 6 oz fiberglass tape to
the top of the bulwark and finish faring and sanding.
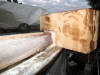
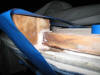
 Today
I sealed the top of the bulwarks with 4 layers of 6 oz 2" wide tape epoxied
to the top edge. Today
I sealed the top of the bulwarks with 4 layers of 6 oz 2" wide tape epoxied
to the top edge.
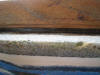
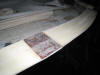
Cleaning Up the Scuppers
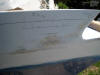
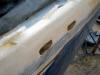 The
scuppers need cleaning up, some uniformity and some strength. I fashioned
them mostly by eye and by hand and it hasn't worked out very well. So I am
taking a different tack. The
scuppers need cleaning up, some uniformity and some strength. I fashioned
them mostly by eye and by hand and it hasn't worked out very well. So I am
taking a different tack.
 I
ordered some U shaped channel fiberglass stock from McMaster Carr. They have
several sizes and I found one that was slightly narrower than the existing
holes and a bit taller. I cut short lengths of channels to fit, and opened
up the scuppers to the required height. I
ordered some U shaped channel fiberglass stock from McMaster Carr. They have
several sizes and I found one that was slightly narrower than the existing
holes and a bit taller. I cut short lengths of channels to fit, and opened
up the scuppers to the required height.
 Then,
I glued them in place with thickened epoxy. Then,
I glued them in place with thickened epoxy.
I will
sand the channels flush with the bulwark when they are fully cured.
Cutting
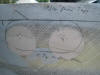
the Hawse Pipe Openings
Cutout
Measurements
| Position |
Lateral |
Vertical |
| Bow |
5-1/2" in from bow |
1-9/16" from top |
| Mid |
Centered |
9/16" from top |
| Stern |
8-7/8" from stern |
13/16" from top |
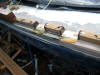
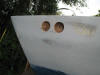
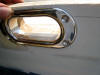
 These
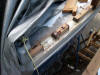
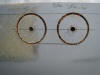
are the hawse pipe fittings I will use. I have 12 of them. They are made by
Seadog, 316L stainless steel. The depth is 7/8" so they will fit almost
against each other on each side of the teak bracing. To position the
fittings for cutting the These
are the hawse pipe fittings I will use. I have 12 of them. They are made by
Seadog, 316L stainless steel. The depth is 7/8" so they will fit almost
against each other on each side of the teak bracing. To position the
fittings for cutting the
 holes
I decided to orient them 1/2 below the top of the bulwarks, and marked a
reference line to that effect. I will cut the open by cutting holes with a
forstner bit the size of each curved side of the fitting and then cutting
between the holes with a jig saw. holes
I decided to orient them 1/2 below the top of the bulwarks, and marked a
reference line to that effect. I will cut the open by cutting holes with a
forstner bit the size of each curved side of the fitting and then cutting
between the holes with a jig saw.
So I began
by marking an upper margin for the top of each hawse pipe. Since the
bulwarks are different heights at each hawse pipe location I felt that to
continue the scale of the sheer the upper margin had to be so inclined as
well.
 I
first marked the aft hawse pipe and cut the two round holes thru the outer
glass layers with a forstner bit. I then decided that I had located the
holes too low on the bulwarks, so I filled those two holes. I
first marked the aft hawse pipe and cut the two round holes thru the outer
glass layers with a forstner bit. I then decided that I had located the
holes too low on the bulwarks, so I filled those two holes.
I then
marked each hawse pipe location with what I felt was a good aesthetic margin
based on the height of the bulwark.
 The
bow hawse pipe is 1-9/16" from the top. The
bow hawse pipe is 1-9/16" from the top.
 The
mid spring hawse pipe is 9/16" from the top. The
mid spring hawse pipe is 9/16" from the top.
 The
aft hawse pipe is 13/16" from the top. The
aft hawse pipe is 13/16" from the top.
Thus I
began working on
 the
mid spring hawse pipe. Instead of the forstner bit which took forever to
cut, I used a 1-3/4" hole saw, which took almost forever--literally about 45
minutes to cut thru each side of the hole. the
mid spring hawse pipe. Instead of the forstner bit which took forever to
cut, I used a 1-3/4" hole saw, which took almost forever--literally about 45
minutes to cut thru each side of the hole.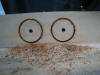 I used the same size bit to drill all the way thru the bulwark and then back
cut the holes from the inside to make a cleaner cut. I used a cordless
I used the same size bit to drill all the way thru the bulwark and then back
cut the holes from the inside to make a cleaner cut. I used a cordless
 18
volt drill with a built in level to keep the hole in alignment. It worked
very slowly but very well. 18
volt drill with a built in level to keep the hole in alignment. It worked
very slowly but very well.
 Once
the first hole was cut, I turned to the second hole. and when that was cut
thru I used the hole saw to cut a middle hole. The middle hole was
infinitely faster and more accurate than using a jig saw thru two inches of
teak and 24 ounce biaxial cloth. Once
the first hole was cut, I turned to the second hole. and when that was cut
thru I used the hole saw to cut a middle hole. The middle hole was
infinitely faster and more accurate than using a jig saw thru two inches of
teak and 24 ounce biaxial cloth.
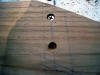
 I
used a hand rasp to square up the hole and fit it to the hawse pipe. I
used a hand rasp to square up the hole and fit it to the hawse pipe.
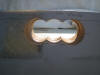
 Here
you can see the hawse pipe dry fitted. And, of course, once everything fit
as it should, Here
you can see the hawse pipe dry fitted. And, of course, once everything fit
as it should,
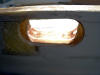
 I
painted the interior with the first of three coats of unthickened epoxy. The
one hawse pipe opening took an afternoon to do so I will tackle the other
two this coming weekend. I
painted the interior with the first of three coats of unthickened epoxy. The
one hawse pipe opening took an afternoon to do so I will tackle the other
two this coming weekend.
Mounting the Hawse Pipes
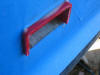
Mounting Stern Fairleads
 This
is one of two stern anchor fairleads I will mount in the dewatering openings
in the stern bulwark. To mount them firmly I will overbore the mounting
holes, fill with a high density thickened epoxy; and then re-drill and tap
the holes. This
is one of two stern anchor fairleads I will mount in the dewatering openings
in the stern bulwark. To mount them firmly I will overbore the mounting
holes, fill with a high density thickened epoxy; and then re-drill and tap
the holes.
 This
is the starboard fairlead This
is the starboard fairlead
 with
the rollers stripped off and the holes marked. The port side is similar. with
the rollers stripped off and the holes marked. The port side is similar.
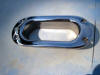
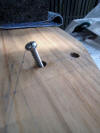
 I
used a 1" spade bore to cut the I
used a 1" spade bore to cut the
 holes,
each about 1-1/2" deep. Here is the port side. Then I filled the four holes
with a thick mix of epoxy and aluminum powder (the highest density thickener
I had on hand). After the epoxy hardened I repositioned the fairleads,
remarked the 3/8" holes and drilled them about 1/8" deep. I will drill and
tap the holes after I finish painting the decks. holes,
each about 1-1/2" deep. Here is the port side. Then I filled the four holes
with a thick mix of epoxy and aluminum powder (the highest density thickener
I had on hand). After the epoxy hardened I repositioned the fairleads,
remarked the 3/8" holes and drilled them about 1/8" deep. I will drill and
tap the holes after I finish painting the decks.
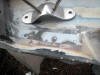
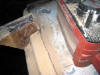
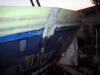
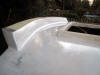
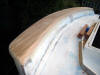
Building the Stern Bulwark
The taffrail turns out to have been very
poorly built by the yard. The turn of the hull at the hull to deck joint,
under the teak toerail has a
 large void at the point where the back stay chainplate makes the turn over the toerail. This constant pressure from the
rigging had actually dented the hull flange under the chainplate. I
have always known something must be amiss but not until I started fairing
through the gelcoat did I discover how poorly that part of the hull to deck
joint is. large void at the point where the back stay chainplate makes the turn over the toerail. This constant pressure from the
rigging had actually dented the hull flange under the chainplate. I
have always known something must be amiss but not until I started fairing
through the gelcoat did I discover how poorly that part of the hull to deck
joint is.
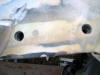
 I
cleaned out the void and filled it with thickened epoxy. When it hardened I
shaped the flange back to the way it should be with a sander. I
cleaned out the void and filled it with thickened epoxy. When it hardened I
shaped the flange back to the way it should be with a sander.
 With some chisel work I opened up the
flange under the toerail and dug out With some chisel work I opened up the
flange under the toerail and dug out
 all the old mastic--still soft, gooey
and sealing I suppose, but I want to bond the hull flange, the deck flange,
the toerail and the bulwark I will build all together. I glued up some pieces of teak for the
two ends of the taffrail and the center area which will take the pressure
and stress of the backstay chainplate. These will be cut roughly to pick up
the angle of the transom and extend that angle up 3-1/8 inches. Between the
teak. I will add Styrofoam as I did with the starboard bulwark. all the old mastic--still soft, gooey
and sealing I suppose, but I want to bond the hull flange, the deck flange,
the toerail and the bulwark I will build all together. I glued up some pieces of teak for the
two ends of the taffrail and the center area which will take the pressure
and stress of the backstay chainplate. These will be cut roughly to pick up
the angle of the transom and extend that angle up 3-1/8 inches. Between the
teak. I will add Styrofoam as I did with the starboard bulwark.
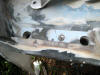
I began with the teak end cap for the
starboard side. I made a cardboard template of the notch needed for the
toerail and then cut
 one
of the glued one
of the glued
 up
pieces of teak on my band saw roughly to fit. I drilled a couple of holes
for temporary screws to hold it in place until the glue kicked. up
pieces of teak on my band saw roughly to fit. I drilled a couple of holes
for temporary screws to hold it in place until the glue kicked.
 Then
I wetted out the surfaces with epoxy and then sat it down in very thick
epoxy and ran the screws in just enough to hold it in place. Then
I wetted out the surfaces with epoxy and then sat it down in very thick
epoxy and ran the screws in just enough to hold it in place.
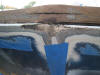
Next, I cut the middle teak brace to
fit using the same template. This
 teak
will take the pressure of the backstay chainplate and needs to be mounted
very teak
will take the pressure of the backstay chainplate and needs to be mounted
very
 strongly.
Again, I wiped down everything with acetone, wetted out the surfaces with
epoxy and mounted the teak in heavily thickened epoxy. I used some tape to
hold it in place. By this time it was almost dark. strongly.
Again, I wiped down everything with acetone, wetted out the surfaces with
epoxy and mounted the teak in heavily thickened epoxy. I used some tape to
hold it in place. By this time it was almost dark.
 Here
are two more shots of the center teak brace. Here
are two more shots of the center teak brace.
 Today
I spent a few minutes shaping the two teak braces I had previously glued up. Today
I spent a few minutes shaping the two teak braces I had previously glued up.
 I used a Japanese saw to cut the the outboard angle on the starboard
brace to the angle of the transom and sloped the inside
angle the same I used a Japanese saw to cut the the outboard angle on the starboard
brace to the angle of the transom and sloped the inside
angle the same
 using
a belt sander. I cleaned it up and rounded it a bit
with the belt sander. using
a belt sander. I cleaned it up and rounded it a bit
with the belt sander.
 Then
I used the belt sander to add the same slope to the inboard center brace. Then
I used the belt sander to add the same slope to the inboard center brace.
 Finally
I drilled two holes for 5/16" bolts to mechanically tie down the center
brace to the deck. It's probably unnecessary but it's easier to do it now
and only took a minute. The 5-1/2" bolts are submerged in thickened epoxy. Finally
I drilled two holes for 5/16" bolts to mechanically tie down the center
brace to the deck. It's probably unnecessary but it's easier to do it now
and only took a minute. The 5-1/2" bolts are submerged in thickened epoxy.
 The
next step is to mount the port teak endcap. I temporarily screwed it down to The
next step is to mount the port teak endcap. I temporarily screwed it down to
 hold
it in place until the epoxy kicked. I cut the outboard angle with a Japanese
saw and used my belt sander to shape the inside bevel. hold
it in place until the epoxy kicked. I cut the outboard angle with a Japanese
saw and used my belt sander to shape the inside bevel.
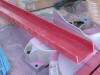
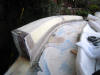
 I
began adding Styrofoam to shape the bulwarks between the teak braces. I
began adding Styrofoam to shape the bulwarks between the teak braces.
 You
can see in the photo the beginning of this. You
can see in the photo the beginning of this.
 Here
is what will go in each dewatering break in the stern bulwark. Here
is what will go in each dewatering break in the stern bulwark.
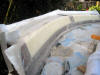
 Here
is the first layer of Styrofoam added to the bulwark and beveled to the
angle of the transom. Here
is the first layer of Styrofoam added to the bulwark and beveled to the
angle of the transom.
 Now,
for the top layer of Styrofoam. I cut two block large enough to fit the Now,
for the top layer of Styrofoam. I cut two block large enough to fit the
 Istarboard
and port sides of the stern bulwark and trimmed them to fit with a Japanese
saw. wetted out the Istarboard
and port sides of the stern bulwark and trimmed them to fit with a Japanese
saw. wetted out the
 surfaces
with unthickened epoxy and and made up several batches thick enough not to
be runny to bed the two foam pieces in. After the epoxy dried, I sanded the
foam and teak with surfaces
with unthickened epoxy and and made up several batches thick enough not to
be runny to bed the two foam pieces in. After the epoxy dried, I sanded the
foam and teak with
 60
grade 60
grade
 sandpaper
on a palm sander. The foam can be smoothed and shaped very easily and
controllably this way. To end the day, I added one layer of 9 oz cloth over
the foam to protect it from damage. sandpaper
on a palm sander. The foam can be smoothed and shaped very easily and
controllably this way. To end the day, I added one layer of 9 oz cloth over
the foam to protect it from damage.
The next
morning I began glassing two layers of 24 oz bias to the bulwark, over the
single layer of 9 oz fiberglass tape. I first built up a nice fillet on
 the
inside joint of the toerail to the stern deck. I then painted the front and
back of the the
inside joint of the toerail to the stern deck. I then painted the front and
back of the
 bulwark
with epoxy and when both the unthickened epoxy began to kick and the fillet
was at the rubbery stage, I laid on the biax, smoothed it by hand and
painted on enough fresh epoxy to saturate the cloth but not to have epoxy
running out of it. When all the glass is hard, I will trim off the
excess with a Japanese saw. bulwark
with epoxy and when both the unthickened epoxy began to kick and the fillet
was at the rubbery stage, I laid on the biax, smoothed it by hand and
painted on enough fresh epoxy to saturate the cloth but not to have epoxy
running out of it. When all the glass is hard, I will trim off the
excess with a Japanese saw.
Later in
the afternoon, the epoxy had hardened and I used my saw to trim off the
excess cloth around the bulwark. Here are some shots of it, ready to fill
sand and be done with it.
 Today
I painted part of the stern deck and the stern bulwark with System Three
WR-155 epoxy primer. Two coats took most of the afternoon to dry. The primer
is a high build primer that sands very easily. Today
I painted part of the stern deck and the stern bulwark with System Three
WR-155 epoxy primer. Two coats took most of the afternoon to dry. The primer
is a high build primer that sands very easily.
 I
will sand most of the primer away to be sure and catch the slight high
spots. I
will sand most of the primer away to be sure and catch the slight high
spots.
Fitting the Stern Caprail
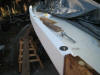
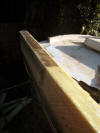
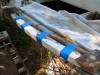
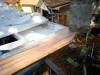
Today I
began installing the caprail for the taffrail bulwark. The taffrail has a
compound curve and to help ease the bend in the teak I have had the board
suspended with about 30 pounds of weight for the past 6 months. Today I
rough cut the inside curve, and because I needed more width than I had in
the board, I glued the straight edge of the trimmed piece
to the back side of the board. I used Titebond III for the glue.
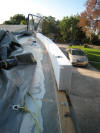
 Here
the board is positioned correctly and bent into position with a heavy
concrete block on each end. I need to order some 1/4 inch by 2 inch self
tapping screws before Here
the board is positioned correctly and bent into position with a heavy
concrete block on each end. I need to order some 1/4 inch by 2 inch self
tapping screws before
 I
test mount it. In the meantime, here are some photos of the board in
position. I
test mount it. In the meantime, here are some photos of the board in
position.
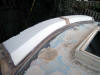
The next
step in attachment is to drill the holes to secure it. I set it up aligned
 and
weighted with a and
weighted with a
 cinder
block and an old battery, and drilled the holes #14 for 316 stainless 1/4" x
2" screws. The aft screw at each attachment point is slanted to assume the
angle of the stern. Once everything was predrilled and counter sunk to
the depth I wanted, I painted both the bottom of the caprail and the top of
the bulwark with unthickened epoxy and left it for a while. then I mixed up
a total of two large batches of very thick epoxy, thickened with West 404
high density adhesive filler, and slopped it on the top of the bulwark. Them
I reattached the caprail. weighting it again at the ends, and screwing it in
place. Most of the epoxy squeezed back out so I carefully caught all of that
with a squeegee and cleaned up the top and bottom edges. cinder
block and an old battery, and drilled the holes #14 for 316 stainless 1/4" x
2" screws. The aft screw at each attachment point is slanted to assume the
angle of the stern. Once everything was predrilled and counter sunk to
the depth I wanted, I painted both the bottom of the caprail and the top of
the bulwark with unthickened epoxy and left it for a while. then I mixed up
a total of two large batches of very thick epoxy, thickened with West 404
high density adhesive filler, and slopped it on the top of the bulwark. Them
I reattached the caprail. weighting it again at the ends, and screwing it in
place. Most of the epoxy squeezed back out so I carefully caught all of that
with a squeegee and cleaned up the top and bottom edges.
After the
epoxy had completely kicked, I removed the weights on the
 ends,
and rough cut off the ends,
and rough cut off the
 overhanging
board. I used the edges of the two boards next to the cut to cut 1/2" bungs
for the counter sunk screws. I glued the bungs in with TiteBond III. overhanging
board. I used the edges of the two boards next to the cut to cut 1/2" bungs
for the counter sunk screws. I glued the bungs in with TiteBond III.
After the
glue set, I drew an outline of the aft curve, taking it off from the
 transom
underneath the caprail, and cut with my jig saw. I wanted to get the
basic shape of the caprail early so that I could address how I would support
the backstay chain plate. Before I began the stern bulwark, I
discovered that the chainplate had compressed the turn of the hull to deck
joint because of some voids. transom
underneath the caprail, and cut with my jig saw. I wanted to get the
basic shape of the caprail early so that I could address how I would support
the backstay chain plate. Before I began the stern bulwark, I
discovered that the chainplate had compressed the turn of the hull to deck
joint because of some voids.
 I
want to back up where the chainplate overlaps the caprail, to brace the fiberglass, so the finish on the caprail can be renewed without
removing the chain plate. I trimmed the aft edge of the caprail at the chain
plate back to the hull and fashioned a piece of 1/4" thick fiberglass to the
height of the caprail I
want to back up where the chainplate overlaps the caprail, to brace the fiberglass, so the finish on the caprail can be renewed without
removing the chain plate. I trimmed the aft edge of the caprail at the chain
plate back to the hull and fashioned a piece of 1/4" thick fiberglass to the
height of the caprail
 and
glued it to the teak with thickened epoxy. When it hardens I will shape it
with my belt sander. It will get painted along with the topsides, the
adjoining teak will be finished bright. and
glued it to the teak with thickened epoxy. When it hardens I will shape it
with my belt sander. It will get painted along with the topsides, the
adjoining teak will be finished bright.
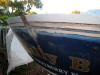
 After
some time with my Festool Rotex 150 I arrived at the basic shape I wanted
for the caprail. The forward edge assumes the same angle as the After
some time with my Festool Rotex 150 I arrived at the basic shape I wanted
for the caprail. The forward edge assumes the same angle as the
 front
of the bulwark. The aft edge is nicely bullnosed. Here are some photos. This
teak you may notice--which is part of the purchase I made for all the teak
for the caprails, front
of the bulwark. The aft edge is nicely bullnosed. Here are some photos. This
teak you may notice--which is part of the purchase I made for all the teak
for the caprails,
 covering
boards and coaming--is plantation grown teak, much more blond with streaks
of pink and less brown than Burma teak. I really like the light color and
contrast to the darker teak used elsewhere on the boat. covering
boards and coaming--is plantation grown teak, much more blond with streaks
of pink and less brown than Burma teak. I really like the light color and
contrast to the darker teak used elsewhere on the boat.
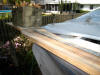
 The
first coat of epoxy applied. I will apply two more and then three coats of
System Three LPU clear gloss. The
first coat of epoxy applied. I will apply two more and then three coats of
System Three LPU clear gloss.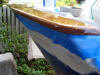
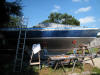
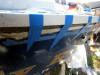
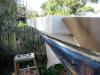
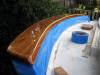
Finishing the Starboard Bulwark
This weekend I completed the final
filling and sanding using an air driven board sander. One of the time
consuming aspects of the starboard bulwark that I will not repeat on the
port side is using the 24 ox biax as a final finish layer of fiberglass. On
the stern bulwark I added a layer of 9 oz cloth over the biax when it was
still green and the cloth made a much smoother and easier surface to fill
and finish. In retrospect I wish I had thought to do this to the starboard
bulwark as it has consumed too many hours filling the rough surface of the
biaxial cloth. I am learning as I go so at least the port side will be
faster to complete.
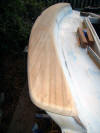
Once I finished sanding everything
smooth with 60 grit paper, I applied three coats of System three Silvertip
water-based epoxy high build primer. It dried almost at once in the temps
today, and I was able to apply three coats within an hour. I then went over
the surface and filled some very small pin holes (from the biax) with a thin
mix of epoxy and West 410 Microlight filler. I will sand the filler smooth
during the week. Here are some photos showing the bulwark and the transition
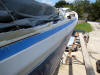
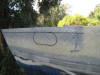
from the hull to the bulwark. I like the results
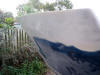
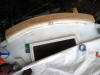
If you are familiar with Bristols and
the B29 specifically, you may have noticed that I filled in the cove stripe.
Bristol molded a nice half round cove stripe into all of their hulls, but
unfortunately, the cove stripe on my boat does not follow the new sheer, and
it was really too low in relation to the bulwarks, so I filled it. I may add
a new cove stripe, but it would be some sort of Mylar tape if I do.
Continue on to Part 2 |