|
Home News Plans Dimensions Projects Modifications Sources Links About Site Map Search |
|
|
|
|
|
Spar Improvements
|
|
||||||||||||||
|
During my year-long refit in 1995 I made a number of improvements to the Bristol's mast, including an inner forestay and running backstays, painting, running new wiring inside pace conduit, new spreaders, sockets, and masthead. In 1988 I replaced the stays and shrouds with new wire one size larger. This time around I am mostly concerned with replacing the aging halyard winches, adding a third winch that will be used for the staysail halyard or the spinnaker halyard, and perhaps a fourth winch for the reefing clew lines--I haven't quite figured out the best approach to that yet. Removing the Old Winches It took several weeks, a lot of PB Blaster, hammering and elbow grease to get the original Merriman winches off the mast. The machine screws were frozen and I thought at one point I would have to drill them out to get the bases off. But instead, I kept soaking each side in the solvent, and working with the biggest screwdriver Sears sells and a long adjustable wrench on the shank I began to turn them little by little. A couple of the heads broke off, which made it even easier.
Adding a New Winch Base
After
flipping and flopping back and forth on winches for the mast I finally
decided to add a separate winch for the reefing lines (I had previously
thought to use the main winch for that purpose--adding a rope clutch to the
main halyard--but the lead wasn't fair to that winch). So the first order of
business was to fabricate a winch base for the Lewmar 7 winch I decided to
use. I found an empty Cool Whip container that seemed the right diameter
and took off the profile of the mast onto the bottom sides of the container.
Since I had prepared the boom for
painting it seemed the logical thing to redo the mast as well. I had painted
it with Interthane Plus in 1995, but at this point the paint was very chalky
and had lost all its luster.
Today I got the first coat of System Three WR-155 epoxy primer on the mast. I had earlier sprayed a zinc chromate primer on all areas where I had sanded down to bare metal and I used the sanded Interthane Plus as a primer base for the rest of the spars. This was my first experience spraying the water-reducible epoxy primer and after fiddling with the controls of my Wagner 2600 HVLP sprayer it went on very nicely. The WR-155 dries in two stages: first by evaporation of the water used to reduce it, and secondly by chemical reaction to the hardener. It takes about 3 weeks to achieve maximum hardness, but can be sanded once the water has completely evaporated. To test for that, wet your finger and rub against the paint--if any comes off on your skin, it needs more curing time.
The next step is to provide a better
wire route for the wires at the base of the mast. Previously, when I rewired
the mast in 1995, I had brought each wire thru its own hole, making lots of
holes in the base and not a very shipshape look. More importantly, the wires
were not protected from the elements, nor from a careless step by a crew
working at the mast. So this refit I want to bring all the wires out thru
one hole, inside a hose to a deck fitting to enter the cabin top. The
circumference of the wires is about 3/4" so I visited Home Depot
When the epoxy hardened,
Rain bands from Katrina and Rita have kept me away from the spars, but this weekend I had clear skies and took up the work again. First, I wet sanded the System Three primer. A quick impression: this is epoxy, no doubt about it--whether it can be reduced with water or catsup, this stuff is hard, hard epoxy and takes a lot of sanding. The good news is the primer fills very well and sands extremely smooth. I went over the mast and boom with first 220 and the 400 grade wet or dry and the surface is very smooth and ready to be top coated. I also reassembled the masthead and ordered new blocks for the topping lift, spinnaker crane and staysail halyard from Garhauer Marine. Finally an overcast, humid mild day in the low 80's. I figure there isn't a better opportunity to give the boom and spreaders a first coat of Orcas White. The results I will give you in advance of the details. It was very easy to use, very controllable and I am very pleased. Mixing: I poured 10 oz of paint into the spray gun reservoir. S3 recommends starting with a dilution of 10 to 15 percent. I started with 20, adding 2 oz of clean water. I mixed with a mixer on my drill, and popped on the top. Earlier I had changed the spray needle from a #3 to a #2, which is a 1mm diameter needle. Adjusting the gun: I use the standard gun that comes with the Wagner 2600. No magic here: I simply adjusted the spray pattern to a small pattern and adjusted the needle valve until I got a good amount of paint coming out, and began. Spraying: I stuck to my rule of spraying very light coats. I learned quickly that spraying until the surface looks shiny is enough. Let it get shiny and then dry off--takes about 5 minutes--then spray again. This method built up a nice smooth satin surface with no runs. It was very easy to control. Cleaning up: I washed everything in the sink. Then ran some clean water thru the gun to clean it. Then ran just air thru the gun to dry it completely. Remember to wash out your air filters if you are using the Wagner.
I applied the second coat of Orcas White this weekend. I had called System Three technical support to confirm that I was doing what I should. The technician was very helpful and said that I had the right needle valve and I was thinning correctly. Just keep doing what I have been doing--basically laying down very very thin coats. Again I mixed 10 ounces of paint with two ounces of water, added the left over thinned paint from coat #1, stirred it thoroughly and began spraying. I will do the first of two clear coats this coming weekend if the weather permits. I have also ordered an addition 25 feet of hose for the Wagner 2600. I will run that hose thru a cooler of ice water to cool the air coming out of the turbine and see if it makes a difference. So far my impressions are: this is not rocket science, and I made the right choice using the System Three paint instead of struggling with Awlgrip or a similar product. Finishing the Finish on the Spars
Today I applied the final coat of Orcas
White to the spars, and after allowing it to dry, applied two coats of gloss
clear coat. This was my first experience shooting the clear and it handled
slightly differently than the pigmented paint. I found that I needed to thin
it an addition 5% over what I thin the Orcas White. With the pigmented
paint, you must apply it in very thin coats to prevent it from running. The
clear wants to be applied in thicker coats so that it can flow. It dries
faster than the pigmented paint and once I adjusted the gun properly, was
very easy to work with.
Today I took some time to begin
mounting hardware back on the mast.
A halyard retainer is a small block
that mounts to the leading
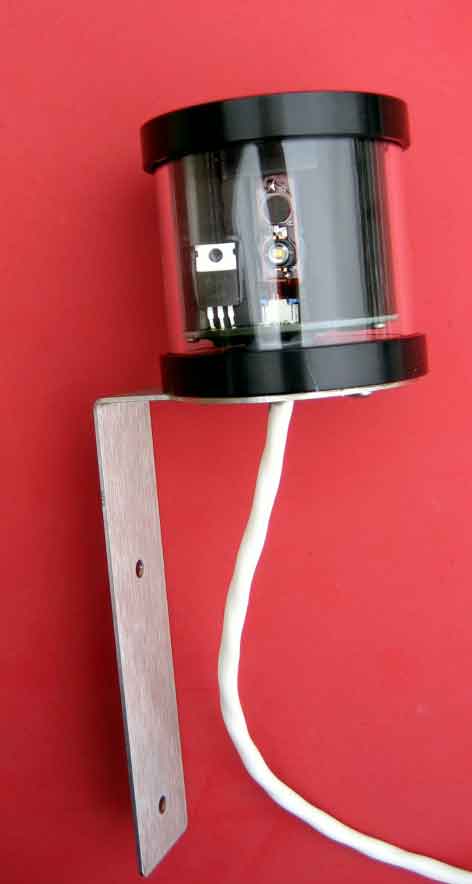
It's built like a Mack truck - anodized aluminum and glass, water proof and potted, when compared with the Aqua Signal it replaced (plastic, corroded after 10 years, big and bulky) the OGM wins hands down.
Drastically less current draw - .5 amps
per hour instead of 2 amps per hour, meaning 4 amps for a whole night at
anchor instead of 16 amps. The
Longer-lasting - 100,000 hours as opposed to say 500 or so before the incandescent bulbs need replacing.
Today I fabricated two 10' whisker poles for the Bristol. They are simple: I ordered two 10-ft lengths of 1.5" fiberglass tubing, which have a wall thickness of 1/8" and an inside diameter of 1-1/4 inches. I plugged each end of each pole with 12" of wood closet rod which has an OD of 1-1/4" and drove them into thickened epoxy. Then I purchased lovely chrome bronze pole end fittings:
I mounted the fittings on the pole ends and all I need to do is paint.
|
|||||||||||||||
|
Copyright © 2005 - 2014 by David Browne, all rights reserved, hosted in USA
|