So for almost
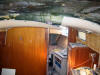
20 years I have been staring at the bland white bathtub look of the cabin
overhead and just hating it. (Even though one of the features of Bristol
29’s over other boats of the same period—such as the earlier Tritons,
Alberg 30’s, early cape Dory’s—is the clean, smooth molded cabin top liner
of the B-29.) But, in my view it’s just plain and unattractive and screams
at me that I own a fiberglass boat. Besides, the full liner has many
limitations:
-
Access to
the underside of the cabin top is impossible.
-
Inspection
is impossible.
-
Thru-bolt
mounting must be made thru the liner as well as the cabin top, which
squeezes the liner in that area. I have gotten around this problem in
the past by either not thru-bolting, but over drilling the holes, filling
with epoxy and then drilling and tapping the epoxy; or foaming the area
between the cabin top and liner before mounting.
-
Impossible
to chase leaks.
-
Impossible
to chase problems with wiring above the liner.
-
A
mass-production solution that just doesn’t appeal to me.
But until I
decided to replace all the ports I lived with it. Now, with the task at
hand to fill in the holes in the cabin sides and add reinforcing plywood
to the insides, the correct way to accomplish the work is to remove the
inside liner and get at the actual glass of the cabin sides.
The steps to
remove the liner are:
-
Use a
RotoZip or similar rotary cutter to cut away the liner in manageable
sections.
Note: I gave up on
the RotoZip early--it worked but was hard work to get into the small
places I needed to cut and threw off enormous quantities of material. I
then when to a metal cutting disk on a 3/8" drill--better but still slow
progress and lots of material thrown off by it. Finally I tried a
ceramic cutting blade (about $14 at Home Depot) for my Dremel tool. That
when through the liner like the proverbial knife through warmed butter.
Very little dust and a tiny kerf. One blade lasted for the whole job and
is still sharp. A great investment!
-
Protect the
overhead light wiring that runs between the cabin top and the liner.
-
Sand/grind
the underside of the cabin top relatively even.
-
Glue strips
of ¼ ply to the underside, in a grid that allow me to cut and install
panels of new material—maybe Formica panels, maybe painted
bead-board, I haven’t decided yet.
-
Cut the
panels to fit and label for installation.
-
Add
insulation between the plywood grid—I haven’t decided what kind yet or
thought much about this step.
-
Do the port
installation.
-
Button it
up with the new overhead.
December 10, 2005
Today I
started demolition in earnest.
 I
began cutting the headliner with a RotoZip rotary cutter, but frankly it was
awkward to use and not easily controlled. I gave it up before I cut through
something important, and went to a thin metal cutting I
began cutting the headliner with a RotoZip rotary cutter, but frankly it was
awkward to use and not easily controlled. I gave it up before I cut through
something important, and went to a thin metal cutting
 disk
mounted to a 90 degree Hitachi 3/8 drill. The cutting wheel works very well,
throws off much less fiberglass shavings and is easy to control. disk
mounted to a 90 degree Hitachi 3/8 drill. The cutting wheel works very well,
throws off much less fiberglass shavings and is easy to control.
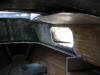
The liner
in the Bristol is about 1/8-in thick and
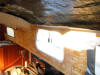 poorly
bonded to the underside of the cabin top with adhesive sealant. Over the
years it had mostly worked loose from that bond, dropped a bit and basically
floated in position. poorly
bonded to the underside of the cabin top with adhesive sealant. Over the
years it had mostly worked loose from that bond, dropped a bit and basically
floated in position.
 I
took care to cut the liner but not cut into the underside of the cabin trunk
and top. It is easy once you get access by taking out a small section to
then drive a wedge into the gap between the liner and the cabin. The wedge
gives more space and less likelihood of cutting too deeply. The
underside of the cabin is surprisingly well finished out. It is painted or
tinted dark green, with few irregularities that will have to be ground
smooth. Stay tuned for more details as I continue removal. I
took care to cut the liner but not cut into the underside of the cabin trunk
and top. It is easy once you get access by taking out a small section to
then drive a wedge into the gap between the liner and the cabin. The wedge
gives more space and less likelihood of cutting too deeply. The
underside of the cabin is surprisingly well finished out. It is painted or
tinted dark green, with few irregularities that will have to be ground
smooth. Stay tuned for more details as I continue removal.
December 11, 2005
I
continued cutting out the liner today until rain forced me to quit and cover
the boat. Here are some of the things I have discovered so far.
-
Bristol
29's have a bad habit of working, which results in cracking the teak
toerail amidships and causing stress cracks in the topsides amidships. I
had always blamed this weakness on lack of a bridge deck, but now I have
discovered that the main saloon bulkhead is not tabbed to the underside of
the cabin top, nor to the cabin trunk. There is good 3/8-in gap that was
filled with the liner and the foam filled, vinyl covered edging. Tabbing
this bulkhead essentially to the hull and deck will significantly
strengthen the boat.
Note: On closer inspection I find that there is tabbing to the
cabin top on the head sides of the main bulkhead and the forward head
bulkhead as well. However, the tabbing does not extend down to the
side decks, which are not tabbed anywhere to interior structures.
-
The
original wiring can only be described as nasty. I found original splices
made with wire nuts. Luckily I bypassed all the original wiring when I
rewired the boat, but if you have ever considered rewiring, one look at
the spaghetti tangle above the liner will convince you.
-
The best
method for cutting sections of the liner without damaging the underside of
the cabin structure is to drive long wedges between the two and force a
larger gap. It's easy to do.
-
The
liner is coming out faster than I had estimated, but I haven't figured out
yet is how to handle the ash
navigation
center, nor the ash rear cabin trunk I built. Both are screwed to the
liner and I hate to think that will have to removed all that and unwire
everything to get those portions of the liner out. Perhaps I can find a
way to cut around the ash and tab the edges of the liner in those areas to
the boat.
December 22 - January 2
Over the
Christmas holidays I continue cutting away at the headliner.
 I
decided not to unwire the navigation cabinet and remove it to get to the
liner it is attached to. Instead I carefully cut around it--frankly it's
just too damn much trouble to remove it. I
decided not to unwire the navigation cabinet and remove it to get to the
liner it is attached to. Instead I carefully cut around it--frankly it's
just too damn much trouble to remove it.
 I
have removed all the trim around the companionway--this will all be replaced
with new teak. And, I continue to work on the headliner in the starboard
quarter berth. My goal is to get all the liner out of the boat before I
return to work on Jan 3. I
have removed all the trim around the companionway--this will all be replaced
with new teak. And, I continue to work on the headliner in the starboard
quarter berth. My goal is to get all the liner out of the boat before I
return to work on Jan 3.
 The
hanging locker caused the most problems in removing the liner. I had to
disassemble most of it first, and to do that I had to remove the The
hanging locker caused the most problems in removing the liner. I had to
disassemble most of it first, and to do that I had to remove the
 white
"Herreshoff" Formica to get at the wood white
"Herreshoff" Formica to get at the wood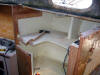 screws that held it together. Once I got the top off (it was one of those
assemblies that had been done prior to the deck going on and a couple of the
screws were inaccessible), I could reach the liner and cut it out.
screws that held it together. Once I got the top off (it was one of those
assemblies that had been done prior to the deck going on and a couple of the
screws were inaccessible), I could reach the liner and cut it out.
 Moving
forward I reached the vee berth Moving
forward I reached the vee berth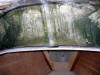 began cutting the headliner away.
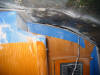
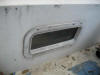 After
removing all the liner from the starboard quarter berth, I removed the port
I had installed into the side of the cockpit. I will fill in this hole when
I fill in the other port holes, and build a starboard cockpit locker in this
area. After
removing all the liner from the starboard quarter berth, I removed the port
I had installed into the side of the cockpit. I will fill in this hole when
I fill in the other port holes, and build a starboard cockpit locker in this
area.
Finally some general clean up and I was
ready to start grinding and beveling the edges of the port openings. Click
here to read more.
January 2
This
morning I finished cutting out the final bit of headliner. I will probably
go ahead and replace the
chainplates before continuing with any further
strengthening or construction.
The new cabin liner will be white matt
finished Formica panels, held in place with teak battens. I have order the
Formica from Lowes. Now is the time to add some insulation and after some
research, I have decided to use two types of insulation on all inside
fiberglass surfaces:
First, painting the inside of the
fiberglass with BilgeKote mixed with insulative ceramic beads from
Hy-Tech
Thermal Solutions. I have used this product in ceiling paint for my home
and it has worked very well. I purchased enough product for two
gallons of paint, and will add it to both the BilgeKote as well as the epoxy
mix used to glue the framework for the panels to the underside of the cabin.
Here are some pictures of the furring strips and paint in progress.
|