| I am building
a seahood because I have decided to
shorten the boom and use a midboom traveler over the companionway. Now
is the time to build a seahood if I'm ever going to build one. The basic construction for this seahood is to mount rails on the cabin top on either side of the closed
companionway hatch, and screw and glue two layers of 1/4
plywood over the existing hatch so the seahood forms the same curve as the
hatch. Then I will remove the assembly and cover in glass and epoxy. When it
is fully sanded and painted, I'll remount it over the hatch.
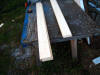 First,
I cut clear basswood, two boards for each side forming two rails about
1-3/4" thick. First,
I cut clear basswood, two boards for each side forming two rails about
1-3/4" thick.
 I
glued the boards together, staggered to take on the angle between the cabin top
and the beveled side of the sliding hatch. I
glued the boards together, staggered to take on the angle between the cabin top
and the beveled side of the sliding hatch.
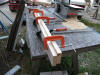
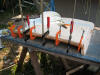
I attached the rails to each side of
the hatch and then
 temporarily
screwed them to the cabin top from underneath. Then I laid the first of two
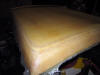
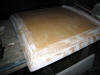
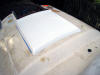
sheets of 1/4" plywood over the rails, glued with thickened epoxy. After
about two hours the epoxy had kicked, I removed the screws, and laid the
second sheet on top, also temporarily screwed. The plywood is held off the
top of the hatch with a 1/4" shim. Once the glue has fully cured, I
will add an end cap at the aft end of the hood to support the shape of the
hatch curve, then remove the hood and cover it with glass. temporarily
screwed them to the cabin top from underneath. Then I laid the first of two
sheets of 1/4" plywood over the rails, glued with thickened epoxy. After
about two hours the epoxy had kicked, I removed the screws, and laid the
second sheet on top, also temporarily screwed. The plywood is held off the
top of the hatch with a 1/4" shim. Once the glue has fully cured, I
will add an end cap at the aft end of the hood to support the shape of the
hatch curve, then remove the hood and cover it with glass.
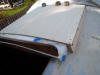
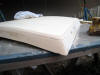
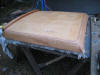
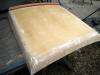
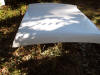
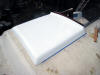
 Here
is the seahood off the boat. I added fillets to all the inside joints in
preparation for fiberglass. Here
is the seahood off the boat. I added fillets to all the inside joints in
preparation for fiberglass.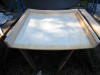
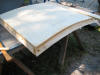
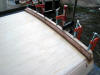
 After
about an hour's work with a rasp, plane and some 40 grit sandpaper, the
overall shape of the seahood began to emerge. After
about an hour's work with a rasp, plane and some 40 grit sandpaper, the
overall shape of the seahood began to emerge.

 Today
I added a second layer of 24 oz biax to the inside front and a third layer
reinforcing the
forward corners. After the biax dried, I fashioned a rear support Today
I added a second layer of 24 oz biax to the inside front and a third layer
reinforcing the
forward corners. After the biax dried, I fashioned a rear support
 / dodger / dodger
 coaming
and glued it in place under a strip of 24 oz biax and thickened epoxy. The
combination will keep the rear edge from deforming and the coaming
will create a watertight lip to attach the bottom of a dodger to. coaming
and glued it in place under a strip of 24 oz biax and thickened epoxy. The
combination will keep the rear edge from deforming and the coaming
will create a watertight lip to attach the bottom of a dodger to.
 After
the coaming dried, I added the first of two layers of 16 oz cloth to the
outside. The method I use to lay cloth is to first cut it to the size
I need, and mark it so I can lay it down without a lot of messing with it.
Then, I paint the surface with unthickened epoxy and wait for it to
begin to kick. When the epoxy begins to gel, I lay out the cloth over the
epoxy and smooth it gently with my hands to get out all the wrinkles and
folds. Then, I After
the coaming dried, I added the first of two layers of 16 oz cloth to the
outside. The method I use to lay cloth is to first cut it to the size
I need, and mark it so I can lay it down without a lot of messing with it.
Then, I paint the surface with unthickened epoxy and wait for it to
begin to kick. When the epoxy begins to gel, I lay out the cloth over the
epoxy and smooth it gently with my hands to get out all the wrinkles and
folds. Then, I
 paint
on more epoxy and use a spreader to move it evenly over the cloth to
thoroughly saturate it but not flood it. While the epoxy is still chemically
gelling. I lay on another layer: here is a picture of the second layer of 16
oz cloth. paint
on more epoxy and use a spreader to move it evenly over the cloth to
thoroughly saturate it but not flood it. While the epoxy is still chemically
gelling. I lay on another layer: here is a picture of the second layer of 16
oz cloth.
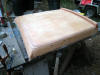
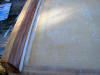
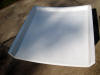
 Finally,
as a top layer I added 6 oz cloth to the second layer as it began to firm
up. In the 70 degree weather we are having I used West System with a fast
hardener--had it been any warmer I would have used a slow hardener to give
me enough pot time. Finally,
as a top layer I added 6 oz cloth to the second layer as it began to firm
up. In the 70 degree weather we are having I used West System with a fast
hardener--had it been any warmer I would have used a slow hardener to give
me enough pot time.
 When
everything hardened, I trimmed off the excess cloth around the bottom edge
with a Japanese saw, and used a rasp and a palm sander to bring the glass
down even with the frame. Then, I washed it down with water and a 3M scrub pad and
filled the sides and about two inches along the top with epoxy thickened
with microballons, a light sanding mix just to fill the weave of the cloth. When
everything hardened, I trimmed off the excess cloth around the bottom edge
with a Japanese saw, and used a rasp and a palm sander to bring the glass
down even with the frame. Then, I washed it down with water and a 3M scrub pad and
filled the sides and about two inches along the top with epoxy thickened
with microballons, a light sanding mix just to fill the weave of the cloth.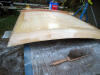 I sanded the filled weave smooth and then painted the same area with
unthickened epoxy to fill any slight irregularities. I will wet sand this
when it dries and then paint the smoothed parameter with white SystemThree
LPU. After that I will tackle the non-skid area.
I sanded the filled weave smooth and then painted the same area with
unthickened epoxy to fill any slight irregularities. I will wet sand this
when it dries and then paint the smoothed parameter with white SystemThree
LPU. After that I will tackle the non-skid area.
 This
morning I wet sanded the "smooth" areas of the seahood and filled some small
imperfections, correcting the fillet between the hood and the aft dodger
splash rail which looked a little ragged. I used West System 410 Microlight
for this work, mixed to a consistency thinner than you think it should be
(It still dripped off the stirring stick), which helps it level and feather
to a very fine edge. I'll do a final sanding when the epoxy dries and add a first
coat of paint later today. This
morning I wet sanded the "smooth" areas of the seahood and filled some small
imperfections, correcting the fillet between the hood and the aft dodger
splash rail which looked a little ragged. I used West System 410 Microlight
for this work, mixed to a consistency thinner than you think it should be
(It still dripped off the stirring stick), which helps it level and feather
to a very fine edge. I'll do a final sanding when the epoxy dries and add a first
coat of paint later today.
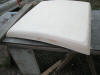
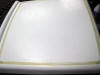
 Here
is the seahood with a first coat of System Three LPU wet sanded. As you can
see I sanded most of the paint away. I wanted to only fill the slight
irregularities. Tomorrow I will spray a first and second coat. It doesn't
look it from the photos, but the epoxy is baby butt smooth at this point. Here
is the seahood with a first coat of System Three LPU wet sanded. As you can
see I sanded most of the paint away. I wanted to only fill the slight
irregularities. Tomorrow I will spray a first and second coat. It doesn't
look it from the photos, but the epoxy is baby butt smooth at this point.
 Here
is the first coat of System Three LPU sprayed. It's a little blotchy, which I
have come to learn means I haven't thinned it enough. ST says to thin the
paint (with water, of course) around 20 percent, but I find, maybe because
of the sprayer I use, that I need to thin more like 50 percent. Today temps
were around 65 or so in the shade, low humidity--perfect conditions for
SystemThree LPU. Here
is the first coat of System Three LPU sprayed. It's a little blotchy, which I
have come to learn means I haven't thinned it enough. ST says to thin the
paint (with water, of course) around 20 percent, but I find, maybe because
of the sprayer I use, that I need to thin more like 50 percent. Today temps
were around 65 or so in the shade, low humidity--perfect conditions for
SystemThree LPU.
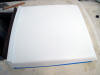
 Here
are some Here
are some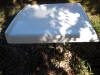 pictures of the second coat, with the paint thinned more than recommended.
It is hard to tell but it covered and flowed better.
pictures of the second coat, with the paint thinned more than recommended.
It is hard to tell but it covered and flowed better.
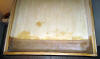
 Here
is the inside of the seahood painted out. Notice the two scuppers I cut with
a rasp. These I coated with epoxy and will paint before installation. Here
is the inside of the seahood painted out. Notice the two scuppers I cut with
a rasp. These I coated with epoxy and will paint before installation.
Next, I tackled the nonskid area. I
masked it off with Fineline tape and mixed up
 a
combination of System Three Orcas White LPU and Interlux Intergrip non-skid
additive. a
combination of System Three Orcas White LPU and Interlux Intergrip non-skid
additive.
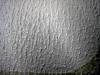
 The
directions called for mixing 6 to 8 ounces in one quart of paint so I
reduced those percentages and mixed one ounce in 4 ounces of paint, followed
by 2 ounces of water as a thinner. I used a 1/4" nap paint roller and even
though the mixed paint was very thin it held the non-skid additive in
solution and rolled on very nicely. Here are closer photos of the results. The
directions called for mixing 6 to 8 ounces in one quart of paint so I
reduced those percentages and mixed one ounce in 4 ounces of paint, followed
by 2 ounces of water as a thinner. I used a 1/4" nap paint roller and even
though the mixed paint was very thin it held the non-skid additive in
solution and rolled on very nicely. Here are closer photos of the results.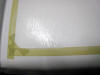
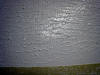
When dry (about 30 minutes) I applied a
second coat of the same proportions: 4 oz of paint, 2 oz of water and 1 oz
of Intergrip, this time with 16 drops of crosslinker. The crosslinker makes
the paint significantly harder and I don't want this nonskid to wear down.
Here's what the second coat looks like: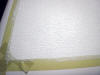
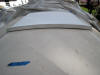
Here are some shots of the seahood
positioned in place on the cabin:
More coming on the
dodger
coamings. For
more projects related to the exterior of the cabin, look
here.
|