|
Part 1
I added a
bowsprit to the Bristol in '88 as part
of the weather helm reduction effort. The boat had so much weather helm that
once sailing in +20 knots of wind, I broke the original bronze tiller head.
At that point I realized something was wrong --in part I now believe she was under ballasted. In any case, I had been
wanting a bowsprit as an anchor platform. I calculated where the boat's
existing c/e was based on measuring the sails and the rigging and determined
that moving the rig 39 inches forward would still keep the c/e aft of the
mast but offer a big reduction in weather helm.
The one mistake I made was not building it
out of teak. I used air dried white oak from Maine instead and it worked
fine for about 13 years before showing signs of rot in one of the glue
joints. White oak is strong but very susceptible to rot. Teak would still be
good as new 17 years later. I'm not sure now why I chose white oak over
teak, except that white oak surpasses teak's resistance to compression,
which I felt was important. It turns out the bowsprit is so over built that
compression isn't an issue.
So this project is simply to replace the wood
with teak, keeping the same design, s/s reinforcements and hardware.
Removing the
old bowsprit
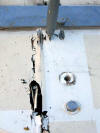 I
spent about 6 hours today slowly removed the 10 bolts holding the bowsprit.
The rot was worse than first appearances--as it usually is. That's a razor
knife sunk into the white oak, meaning the center beam of the sprit is soft
almost to the centerline. As you can see the amount of rot extends far under
the Awlgrip. I keep repeating as I remove the fasteners, "I will not paint a
wood spar. I will not paint a wood spar." I
spent about 6 hours today slowly removed the 10 bolts holding the bowsprit.
The rot was worse than first appearances--as it usually is. That's a razor
knife sunk into the white oak, meaning the center beam of the sprit is soft
almost to the centerline. As you can see the amount of rot extends far under
the Awlgrip. I keep repeating as I remove the fasteners, "I will not paint a
wood spar. I will not paint a wood spar."
I also found that water had worked its way
down at least one of the bolt holes, rusting the backing washer and more
than likely weakening the wood backing plate I have running under the middle
of the deck.
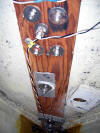 I
will have to remove it as well and replace it with a stronger piece of wood,
probably treated lumber from Home Depot, encapsulated with epoxy. I have had
good success using this combination for all the backing plates for cleats. I
butter up the underside with thickened epoxy that will rest against the
underside of the deck, and install the backing block. Then paint it with epoxy
and finally epoxy paint as a finish coat. I
will have to remove it as well and replace it with a stronger piece of wood,
probably treated lumber from Home Depot, encapsulated with epoxy. I have had
good success using this combination for all the backing plates for cleats. I
butter up the underside with thickened epoxy that will rest against the
underside of the deck, and install the backing block. Then paint it with epoxy
and finally epoxy paint as a finish coat.
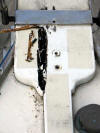 I easily sliced away the paint to reveal just
how punky the white oak is under the Awlgrip. The rot extends several inches
on either side of the glue joint. next I sliced my razor knife under the
parameter of the sprit where I had caulked. It is still glued to the deck
with caulking underneath it, making it very difficult to pry up. Then, I
removed the wood screws attaching the stainless steel surround to the sides
of the sprit. All that remains is to pry the sprit up, breaking the caulking
bond. I will do that next weekend. Stay tuned... I easily sliced away the paint to reveal just
how punky the white oak is under the Awlgrip. The rot extends several inches
on either side of the glue joint. next I sliced my razor knife under the
parameter of the sprit where I had caulked. It is still glued to the deck
with caulking underneath it, making it very difficult to pry up. Then, I
removed the wood screws attaching the stainless steel surround to the sides
of the sprit. All that remains is to pry the sprit up, breaking the caulking
bond. I will do that next weekend. Stay tuned...
Buying 8/4 teak
A hardwood lumber yard for me is like a
neighborhood pub to most people. As soon as I walk in I can tell it it's
"right". It's a combination of the sawdust on the floor, the smell of fresh
cut wood, and if I'm lucky, a proprietor who loves boats. I found such a
place, a great little exotic lumber yard in Edgewood, Florida, a sleepy
little village south of New Smyrna Beach, just off I-95. Called
Chipmunk Hardwood, the owner
has a great supply of teak and found a combination of three boards (two 6"
wide and one 1" wide) that will meet my needs exactly. The teak is 8/4 sawn,
giving me a finished 1-3/4" thickness, by 12-3/4" wide, by 61" long. The
bowsprit moves the forestay out 39-1/2". I will use one 6" board as the
center timber of the sprit. I will split the other 6" board in two 3" halves
and the remaining board will be split into two 3/8" strips to make up the
needed 3/4 inch of width. It will be short 1/8th" from the kerf of the saw
blade but that will make it a little easier to slip the stainless steel
surround over the teak. I plan to use biscuits between the wider laminates,
all glued in thickened epoxy.
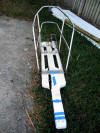
I got the bowsprit off this evening. A
combination of cutting caulking and working it up and down eventually had it
off in hands on a 6-ft ladder.
Next: I'll remove the wood from the
steel surround and begin laminating the teak.
 I
ripped one of the 6" wide teak boards to get two 3" siderails to the main 6"
beam. The narrow 3/4" piece is necessary to make up the required 12-3/4"
width. I will use biscuits in the joints of these boards later today. I
ripped one of the 6" wide teak boards to get two 3" siderails to the main 6"
beam. The narrow 3/4" piece is necessary to make up the required 12-3/4"
width. I will use biscuits in the joints of these boards later today.
Cleaning up the bobstay rigging
Next I cleaned up some of the hardware for the
bowsprit. The Hasselfors turnbuckle, the bobstay and its Sta-Lok fittings. I
know some folks are dead set on bronze turnbuckles, but the Hasselfors are
Swedish, 316 stainless, and really highly made. The Sta-Lok fittings, and the
wire, are all 316. While I will Magnaflux everything before reinstalling the
rigging on the Bristol, I'm sure the 316 stainless will get a clean bill of
health.
 The
Hasselfors before photo, 10 years after its last cleaning and lubing. The
Hasselfors before photo, 10 years after its last cleaning and lubing.
 After
some Comet and warm water it looks like it did when I bought it in 1988. After
some Comet and warm water it looks like it did when I bought it in 1988.
Even the Sta-Lok's came up very nice, with no
rust and no evidence of weakness.
 Before:
kind of nasty looking with light brown stains. Before:
kind of nasty looking with light brown stains.
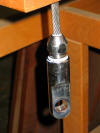 And
after. All stains are gone and the photo shows where I am adding Capt.
Tolley's Creeping Crack Cure to seal the fitting. And
after. All stains are gone and the photo shows where I am adding Capt.
Tolley's Creeping Crack Cure to seal the fitting.
 Here's
the fork end of the bobstay that attaches to the bobstay chainplate above
the waterline. Here's
the fork end of the bobstay that attaches to the bobstay chainplate above
the waterline.
And the cleaned up version also getting sealed.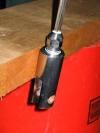
Gluing
the first two planks
There are four planks that need to be laminated
together. I will do two at a time to cut down on the complexity of doing all
of them at once. The first bowsprit was dowelled together; this time I will
use biscuits, which make the joints a bit more accurate hopefully.
 To
cut the biscuits, the first step is to mark the two planks where the cuts
will go. I used a tee square to make perpendicular marks across the two
planks, measuring where I thought it seems logical. To
cut the biscuits, the first step is to mark the two planks where the cuts
will go. I used a tee square to make perpendicular marks across the two
planks, measuring where I thought it seems logical.
 The
importance of this step is to ensure you are square to the planks and that
nothing slips, so I clamped the planks together to make the marks. I will
continue the same marks for the additional two planks to come. The
importance of this step is to ensure you are square to the planks and that
nothing slips, so I clamped the planks together to make the marks. I will
continue the same marks for the additional two planks to come.
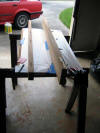
 Next,
I took my biscuit cutter and carefully--oh so carefully--made my cuts. The
cutter I use has a clear plexi gauge so it's simple to line up with the
pencil marks. Next,
I took my biscuit cutter and carefully--oh so carefully--made my cuts. The
cutter I use has a clear plexi gauge so it's simple to line up with the
pencil marks.
 I
wiped both edges down with acetone, an important requirement to remove the
oil from teak, and waited 15 minutes for the acetone to dry. Meanwhile, I
laid out everything I would need for the gluing step. West System recommends
wetting out both edges with epoxy, then thickening what is left and
spreading on a thin, even layer. I mixed up a 5-pump batch and painted the
two edges, being sure to get a good dollop into each of the cuts. Then I
thickened the glue with #405 Filleting Blend to the consistency of peanut
butter, I spread it on one edge and used a fine notched trowel to even the
thickness. Then I dropped in the biscuits and placed the second plank on top
and started clamping. I
wiped both edges down with acetone, an important requirement to remove the
oil from teak, and waited 15 minutes for the acetone to dry. Meanwhile, I
laid out everything I would need for the gluing step. West System recommends
wetting out both edges with epoxy, then thickening what is left and
spreading on a thin, even layer. I mixed up a 5-pump batch and painted the
two edges, being sure to get a good dollop into each of the cuts. Then I
thickened the glue with #405 Filleting Blend to the consistency of peanut
butter, I spread it on one edge and used a fine notched trowel to even the
thickness. Then I dropped in the biscuits and placed the second plank on top
and started clamping.
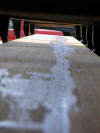 You
want to tighten the clamps only until the thickened mixture starts squeezing
out. If you tighten too much, you risk squeezing it all out and starving the
joint. You
want to tighten the clamps only until the thickened mixture starts squeezing
out. If you tighten too much, you risk squeezing it all out and starving the
joint.
The planks can set up for the next few days;
epoxy doesn't reach its full strength for almost a week. I will add a third
plank this weekend. The wax paper keeps me from gluing the planks to the
bench.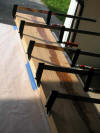
Gluing the
third plank
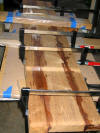
 After waiting 4 days I removed the clamps on the bowsprit and decided to add
the third plank. I marked the bowsprit and the new plank for the biscuit
cuts and cut both sides of the joint. That's my Craftsman biscuit cutter in
the photo, a very nice tool.
 Then,
I followed the same procedure outlined above for wetting out the butt edges
and buttering both sides with thickened epoxy. I clamped everything
together, tightening the clamps just enough to force some of the glue out of
the joint. I'll let it sit until Sunday probably before adding the one
remaining plank. Then,
I followed the same procedure outlined above for wetting out the butt edges
and buttering both sides with thickened epoxy. I clamped everything
together, tightening the clamps just enough to force some of the glue out of
the joint. I'll let it sit until Sunday probably before adding the one
remaining plank.
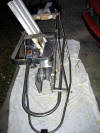 I
still had some daylight, so I got out my handy Sawsall and cut the old
bowsprit to get it out of the steel surround. The back half of the wood was
wedged pretty tightly into the surround, but a few whacks with a hammer broke
it free. I
still had some daylight, so I got out my handy Sawsall and cut the old
bowsprit to get it out of the steel surround. The back half of the wood was
wedged pretty tightly into the surround, but a few whacks with a hammer broke
it free. Seeing it on the ground brings back sentimental memories of building it so
many years ago and its evolution over those years. This new bowsprit is my
50 year one--I don't plan on building another.
Adding the
final plank
 Saturday,
I sanded down the ridges formed from the hardened epoxy using a belt sander.
I discovered about a dozen tiny pinholes where air had apparently escaped
from the biscuit cuts. I marked these, opened them up with a small drill and
filled them with epoxy. Then, I ripped a 6" wide by 1: thick plank of teak
into two side rails each 5/8" thick to make up the remaining 1-1/4" width I
needed for the bowsprit. Saturday,
I sanded down the ridges formed from the hardened epoxy using a belt sander.
I discovered about a dozen tiny pinholes where air had apparently escaped
from the biscuit cuts. I marked these, opened them up with a small drill and
filled them with epoxy. Then, I ripped a 6" wide by 1: thick plank of teak
into two side rails each 5/8" thick to make up the remaining 1-1/4" width I
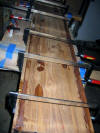
needed for the bowsprit.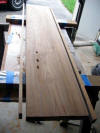 I
biscuit cut the inside edges of the facing surfaces and did the mandatory
wipe down with acetone. Then I wetted out the four surfaces and glued
everything together with thickened epoxy. I
biscuit cut the inside edges of the facing surfaces and did the mandatory
wipe down with acetone. Then I wetted out the four surfaces and glued
everything together with thickened epoxy.
 Tomorrow,
it it's warm enough, I'll sand everything down smooth and start shaping the
teak to fit in the stainless steel surround. Speaking of which, a little
Comet and scrubbing brought it back to almost new condition; all rust stains
gone and the steel gleaming. Tomorrow,
it it's warm enough, I'll sand everything down smooth and start shaping the
teak to fit in the stainless steel surround. Speaking of which, a little
Comet and scrubbing brought it back to almost new condition; all rust stains
gone and the steel gleaming.


Today I sanded everything even and smooth. The
next step is to shape the wood to match the stainless steel surround. I've
ordered new mounting hardware which should be here by midweek. Stay tuned
for that...
On to Part 2 |
