|
Part 2
New bobstay
chainplate
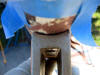
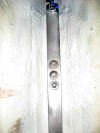
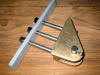 While
the current bobstay chainplate is fine and free from any weakness after 17
years, I came across a beautiful bobstay chainplate from
Spartan Marine. Spartan, the
original hardware foundry for Cape Dory, makes beautiful bronze fittings.
The new chainplate is what they call burnished bronze, with a working
strength of 10,000 pounds--meaning I could lift the Bristol with it. It
comes with the mounting hardware and backing plate you see in the photo. It
is model C-183; about $94. The backing place is aluminum and the mounting
bolts are 5/16" stainless so I will use a stainless backing plate instead
and bronze bolts and nuts to head off any galvanic reaction between the
dissimilar metal. I will have to fill the holes in the bow from the
old chainplate, build up a new backing plate of teak glassed into the bow,
and drill new holes, but all that can wait until after I paint the topsides.
For now it will go in the box with all the rest of the bowsprit hardware. While
the current bobstay chainplate is fine and free from any weakness after 17
years, I came across a beautiful bobstay chainplate from
Spartan Marine. Spartan, the
original hardware foundry for Cape Dory, makes beautiful bronze fittings.
The new chainplate is what they call burnished bronze, with a working
strength of 10,000 pounds--meaning I could lift the Bristol with it. It
comes with the mounting hardware and backing plate you see in the photo. It
is model C-183; about $94. The backing place is aluminum and the mounting
bolts are 5/16" stainless so I will use a stainless backing plate instead
and bronze bolts and nuts to head off any galvanic reaction between the
dissimilar metal. I will have to fill the holes in the bow from the
old chainplate, build up a new backing plate of teak glassed into the bow,
and drill new holes, but all that can wait until after I paint the topsides.
For now it will go in the box with all the rest of the bowsprit hardware.
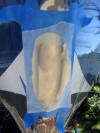
Magnaflux
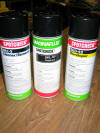 To
be safe I plan to check all the standing rigging using Magnaflux spray.
Magnaflux provides three cans: the cleaner used to clean the part before
checking and clean off the dye after checking; the penetrant, called
SpotCheck; and the developer. I an very curious to see if there are any
hidden flaws in my rigging. To
be safe I plan to check all the standing rigging using Magnaflux spray.
Magnaflux provides three cans: the cleaner used to clean the part before
checking and clean off the dye after checking; the penetrant, called
SpotCheck; and the developer. I an very curious to see if there are any
hidden flaws in my rigging.
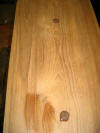
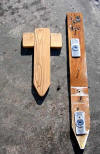
Final shaping
I finished all of the final shaping of the teak
today and got it sanded down to 150 grade.
 I
really wish I had a 14-inch band saw to shape the piece, but all I had was
an anemic jig saw and my trusty belt sander. I used the belt sander (I've
hot glued a level bubble to the top so I can be fairly accurate with it if
I'm careful). The curve you see here at the inboard edge of the sprit was
made with the lid of an old cook pot I have in the garage, I figure a
rounded end like this is as ship shape as anything else I could come up
with. I rough cut about a quarter inch outside the pencil line using a skill
saw, Then I finished using the belt sander. The final step to finish
this edge was bullnose it. I
really wish I had a 14-inch band saw to shape the piece, but all I had was
an anemic jig saw and my trusty belt sander. I used the belt sander (I've
hot glued a level bubble to the top so I can be fairly accurate with it if
I'm careful). The curve you see here at the inboard edge of the sprit was
made with the lid of an old cook pot I have in the garage, I figure a
rounded end like this is as ship shape as anything else I could come up
with. I rough cut about a quarter inch outside the pencil line using a skill
saw, Then I finished using the belt sander. The final step to finish
this edge was bullnose it. Somewhere in the garage I have a router, but I couldn't find it today, so I
marked out a relief with a pencil about 1/3" in from the top and in from the
facing edge. Then I used the belt sander to carefully take off the wood just
to the marks. I smoothed everything out with some 150 grade sandpaper and
called it quits for the day. It came out pretty nice and will look even
better finished.
Somewhere in the garage I have a router, but I couldn't find it today, so I
marked out a relief with a pencil about 1/3" in from the top and in from the
facing edge. Then I used the belt sander to carefully take off the wood just
to the marks. I smoothed everything out with some 150 grade sandpaper and
called it quits for the day. It came out pretty nice and will look even
better finished.
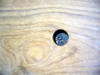
Overboring the mounting holes
I've decided to overbore the mounting holes and
fill them with epoxy as a further protective effort.
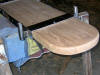 It's
probably overkill It's
probably overkill
 but
hey, this is my 50 year bowsprit, remember? I start by mounting the
teak in the surround, getting it centered and positioned as it will be when
it's permanently mounted on the boat. but
hey, this is my 50 year bowsprit, remember? I start by mounting the
teak in the surround, getting it centered and positioned as it will be when
it's permanently mounted on the boat.
 Next,
I clamp it in place to ensure nothing moves. The clamps force the teak up
against the mounting cross members of the surround exactly as it will be
when the mounting bolts are tightened down. Shaped carefully with my little
belt sander, the teak fits about as perfectly as I can get it. Next,
I clamp it in place to ensure nothing moves. The clamps force the teak up
against the mounting cross members of the surround exactly as it will be
when the mounting bolts are tightened down. Shaped carefully with my little
belt sander, the teak fits about as perfectly as I can get it.
 When
everything is adjusted the way I want it, I mark the mounting holes: one at
the forward edge, one in the middle cross member and one at the aft cross
member. Now to find the exact center of the penciled circle. The holes are
1/2" so I get a half inch bit and turn it in each hole to make an indent,
marking the exact center. When
everything is adjusted the way I want it, I mark the mounting holes: one at
the forward edge, one in the middle cross member and one at the aft cross
member. Now to find the exact center of the penciled circle. The holes are
1/2" so I get a half inch bit and turn it in each hole to make an indent,
marking the exact center.
 Then
I remove the teak from the surround, clamp it up and use a hand brace with a
7/8" bit to bore each of the holes. The holes will be filled with epoxy and
later redrilled at 1/2" through solid epoxy. Then
I remove the teak from the surround, clamp it up and use a hand brace with a
7/8" bit to bore each of the holes. The holes will be filled with epoxy and
later redrilled at 1/2" through solid epoxy.
When the tip of the bit breaks through the
underside of the teak, I stop, turn the unit over and complete my boring
from the other side.
 This
method prevents any splintering of the teak as the bore comes through and
makes as clean a cut as you can get without using a laser, This
method prevents any splintering of the teak as the bore comes through and
makes as clean a cut as you can get without using a laser,
 Finally,
I tape over the underside of the holes and mix up a 4-pump batch of epoxy. I
add enough 405 thickener to it to give it strength but still let it pour. I
fill up each of the holes and add a dribble to the top to round them above
the level of the teak board. Tomorrow I'll sand them down flat and smooth
and re-mark the teak for the 1/2" mounting holes. Finally,
I tape over the underside of the holes and mix up a 4-pump batch of epoxy. I
add enough 405 thickener to it to give it strength but still let it pour. I
fill up each of the holes and add a dribble to the top to round them above
the level of the teak board. Tomorrow I'll sand them down flat and smooth
and re-mark the teak for the 1/2" mounting holes.
Preparing the deck for the
new bowsprit
Cold weather has kept me out of the garage and
off the boat the entire week,
 so
today I started early, concentrating on the bow where the new sprit will
bolt down. This is what your foredeck looks like under that lovely bronze
stemhead fitting. That's the hull to deck joint smiling at you. so
today I started early, concentrating on the bow where the new sprit will
bolt down. This is what your foredeck looks like under that lovely bronze
stemhead fitting. That's the hull to deck joint smiling at you.
 The
gap was filled with the mastic Bristol uses to seal the joint. The good news
is it's still sticky and pliable. The bad news is the screw heads were not
all that tight. I horsed them down, dug out all the mastic The
gap was filled with the mastic Bristol uses to seal the joint. The good news
is it's still sticky and pliable. The bad news is the screw heads were not
all that tight. I horsed them down, dug out all the mastic
 and
cleaned everything up with acetone. Then, I mixed up a batch of thickened
epoxy and leveled everything out as much as I could. It will take a few
coats to fair everything even and smooth. and
cleaned everything up with acetone. Then, I mixed up a batch of thickened
epoxy and leveled everything out as much as I could. It will take a few
coats to fair everything even and smooth.
 While
the epoxy was drying, I took some 1" thick teak and shaped new backing
plates for the sprit. The old backing plate is dry and no rot is evident,
even though one bolt hole leaked enough to rust a fender washer. All told
not too bad for 17 years of use. When I install them I will butter up the
under side with about a 1" thick layer of thickened epoxy and brace them While
the epoxy was drying, I took some 1" thick teak and shaped new backing
plates for the sprit. The old backing plate is dry and no rot is evident,
even though one bolt hole leaked enough to rust a fender washer. All told
not too bad for 17 years of use. When I install them I will butter up the
under side with about a 1" thick layer of thickened epoxy and brace them
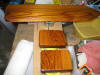 into
position until the glue hardens. The new teak backing plates will last a
good deal longer than that ugly into
position until the glue hardens. The new teak backing plates will last a
good deal longer than that ugly
 piece
of plywood and dress up the forepeak as well. After sanding I applied the
first of two coats of epoxy. I had enough left to start on the bottom of the
sprit and I mixed a bit more and got the whole underside coated with a first
layer. Tomorrow I will flip it over and do the topside, as well as start
leveling the foredeck. piece
of plywood and dress up the forepeak as well. After sanding I applied the
first of two coats of epoxy. I had enough left to start on the bottom of the
sprit and I mixed a bit more and got the whole underside coated with a first
layer. Tomorrow I will flip it over and do the topside, as well as start
leveling the foredeck.
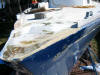
Today I worked mostly on the foredeck, leveling
it, filling gaps and irregularities. The deck is crowned of course so to
ensure the sprit lays flat on it and is supported equally in all areas,
need to build up the edges about 1/4" and taper the build in toward the
centerline. With the first bowsprit I was careless about this, filling the
gap on each side with caulking and now worrying about it.
 This
time I want as much of the deck as possible to squarely support the sprit.
Using my little belt sander with 80 grade paper, I sanded everything as flat
and even as I could. I used a nice square piece of 1" mahogany to lay down
as if it were the bowsprit and I sighted under it. I sanded a little,
checked with my plank; and sanded some more, being careful to keep
everything level and square. This
time I want as much of the deck as possible to squarely support the sprit.
Using my little belt sander with 80 grade paper, I sanded everything as flat
and even as I could. I used a nice square piece of 1" mahogany to lay down
as if it were the bowsprit and I sighted under it. I sanded a little,
checked with my plank; and sanded some more, being careful to keep
everything level and square.
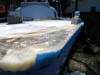 Finally,
the plank rested square and true, and all that remained was to build the
turn of the hull a little. For that I laid the plank down as if it were the
sprit and carefully taped along the topside, with the upper edge of the tape
just touching the bottom of the plank. Then I mixed up a batch of epoxy,
thickened just short of the consistency of peanut butter, so that it would
level itself but not run. I gently ladled this along the edge of the tape a
little high, and then carefully leveled it using a plastic squeegee. Finally,
the plank rested square and true, and all that remained was to build the
turn of the hull a little. For that I laid the plank down as if it were the
sprit and carefully taped along the topside, with the upper edge of the tape
just touching the bottom of the plank. Then I mixed up a batch of epoxy,
thickened just short of the consistency of peanut butter, so that it would
level itself but not run. I gently ladled this along the edge of the tape a
little high, and then carefully leveled it using a plastic squeegee. Once one side was done I waited for it to harden and later this afternoon,
did the other side.
Once one side was done I waited for it to harden and later this afternoon,
did the other side.
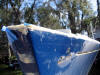 Before
calling it quits for the day I wet sanded the bottom of the bowsprit and
laid on a second coat of epoxy. It's looking very nice. Before
calling it quits for the day I wet sanded the bottom of the bowsprit and
laid on a second coat of epoxy. It's looking very nice.
More bow
and bowsprit work (Mar 19, 2005)
Today I leveled another coat of thickened epoxy
to the foredeck, sanded it smooth and layered on another thin level. The bow
is just about as even and smooth in its eventual support of the bowsprit as
I can get it. I received a quart of System Three's
WR-155 water based
epoxy primer from Jamestown Distributors today. I've never used this product
but thought to try it out on the bow after I finish leveling it. I'll let
you know the results.
 Then,
I drilled the holes on the sides of the bowsprit for the 6 2-1/2" #14
stainless wood Then,
I drilled the holes on the sides of the bowsprit for the 6 2-1/2" #14
stainless wood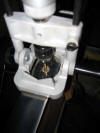 screws that secure the sides of the stainless surround to the teak bowsprit.
I used a portable drill press attachment to keep me square to the edge.
There are three screws to each side. I drilled them all. Then soaked the
holes in heated, thinned epoxy and ran the cooking oil-coated screws down
into the holes. The epoxy hardened, creating permanent tapped holes for the
wood screws that will be impervious to water or rot (again, the 50-year
theory). All that is left to finish up the bowsprit is to add 6 coats of
spar varnish over the epoxy. I will do that over the next couple of weeks as
I wait for my portlights to arrive.
screws that secure the sides of the stainless surround to the teak bowsprit.
I used a portable drill press attachment to keep me square to the edge.
There are three screws to each side. I drilled them all. Then soaked the
holes in heated, thinned epoxy and ran the cooking oil-coated screws down
into the holes. The epoxy hardened, creating permanent tapped holes for the
wood screws that will be impervious to water or rot (again, the 50-year
theory). All that is left to finish up the bowsprit is to add 6 coats of
spar varnish over the epoxy. I will do that over the next couple of weeks as
I wait for my portlights to arrive.
Rebuilding the
bobstay chainplate backing plate
(Mar
26, 2005)
The backing plate was supposedly "improved" by
my yard in 1995 during a year-long haulout. I asked them to replace the
stainless backing plate with a thicker steel plate and add several layers of
roving to the bow area just to beef it up. The next time I visited the yard
the work was completed and everything freshly painted out.
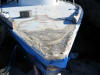
Only today as I was cleaning up the area
preparing to fill the bolt holes with epoxy did I discover that the work
they did had pulled loose from the hull, and had in fact allowed some amount
of water to enter the boat.
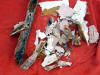 As
I started exploring with a chisel and screw driver, it became clear that
they had simply glassed over the painted surface of the inside of the hull,
and used polyester instead of epoxy resin to boot. I literally pulled the
whole mess out with my fingers. I'm sure there are yards out there that do
meticulous work, but I haven't found any of them yet. As for this sloppy
work, I can only blame myself for not doing it right and asking strangers
with no vested interest in my boat, her rig, or my life to work on such a
critical area. I won't make that mistake again. As
I started exploring with a chisel and screw driver, it became clear that
they had simply glassed over the painted surface of the inside of the hull,
and used polyester instead of epoxy resin to boot. I literally pulled the
whole mess out with my fingers. I'm sure there are yards out there that do
meticulous work, but I haven't found any of them yet. As for this sloppy
work, I can only blame myself for not doing it right and asking strangers
with no vested interest in my boat, her rig, or my life to work on such a
critical area. I won't make that mistake again.
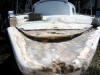
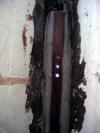
 To
correct the problem I laminated together some scraps of teak in thickened
epoxy and let it dry thoroughly. Then I used a caliper to take off the
dimensions of the inside of the bow and transferred them to the teak and
started shaping To
correct the problem I laminated together some scraps of teak in thickened
epoxy and let it dry thoroughly. Then I used a caliper to take off the
dimensions of the inside of the bow and transferred them to the teak and
started shaping
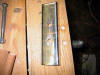
 with
a hand plane. The photo shows the old roving "mold" that pulled away from
the inside of the bow, and the shaped teak backing plate that replaces it. with
a hand plane. The photo shows the old roving "mold" that pulled away from
the inside of the bow, and the shaped teak backing plate that replaces it.
I will rough up the fiberglass and set the block
in a load of thickened epoxy. Then drill the holes through the bow and the
backing plate for the new chainplate fitting. To complete the installation,
I ordered plate stock stainless steel from
McMaster 1/8" thick, by 1-1/2" wide
by 12" long. I will shape this into a chainplate to tie the deck to the
bobstay chainplate and act as a backing plate for the bobstay chainplate
bolts as well.
Tying down the deck
to the bobstay chainplate
Because of the upward force of the inner
forestay, it is a safety factor to connect the backing plate of the inner
forestay chainplate to the hull, and in the case of the Bristol, it will
connect to the backing plate for the bobstay chainplate. So as I wait for
McMaster to ship the stainless steel stock that I will use to fashion the
bobstay backing plate, I begin to cogitate about how to connect it with a
turnbuckle to the backing plate for the inner forestay.
 Rummaging
about in the garage produces some stainless angle plate that I had made at
one time but never got around to using. The angle plate, originally intended
to protect the oak bowsprit from chafe is 1-1/2 " wide on one side and 3/4"
on the other. It will do perfectly well as a backing plate for two of the
four through bolts of the inner forestay chainplate. Rummaging
about in the garage produces some stainless angle plate that I had made at
one time but never got around to using. The angle plate, originally intended
to protect the oak bowsprit from chafe is 1-1/2 " wide on one side and 3/4"
on the other. It will do perfectly well as a backing plate for two of the
four through bolts of the inner forestay chainplate.
 I
mark it to align with the two cross holes of the chainplate and drill it.
Tomorrow I will drill the I
mark it to align with the two cross holes of the chainplate and drill it.
Tomorrow I will drill the
 angle
in the center of the two holes. The angle with its single hole will point
down, and I will swage a nicopressed wire around it, that will feed down
about 12 inches to the top of a turnbuckle. The other end of the turnbuckle
will be pinned to a hole I will drill in the top of the plate stock from
McMaster that will be the backing plate for the bobstay chainplate. Then,
all I have to do is tighten the turnbuckle to hold the deck down (not that I
suspect it would lift up at all but it is a standard precaution when rigging
an inner forestay). angle
in the center of the two holes. The angle with its single hole will point
down, and I will swage a nicopressed wire around it, that will feed down
about 12 inches to the top of a turnbuckle. The other end of the turnbuckle
will be pinned to a hole I will drill in the top of the plate stock from
McMaster that will be the backing plate for the bobstay chainplate. Then,
all I have to do is tighten the turnbuckle to hold the deck down (not that I
suspect it would lift up at all but it is a standard precaution when rigging
an inner forestay).
 I
drilled the angle for the wire connection to the turnbuckle. Then I inserted
a 1/8" stainless thimble and the 1/8" wire around it and set up the
Nico
press zinc collar in the hand press. I
drilled the angle for the wire connection to the turnbuckle. Then I inserted
a 1/8" stainless thimble and the 1/8" wire around it and set up the
Nico
press zinc collar in the hand press.
 Eight-inch
wire need three swages, which I gave the fitting. I will trim the wire and
add the other thimble and eye when everything is assembled on the boat. Eight-inch
wire need three swages, which I gave the fitting. I will trim the wire and
add the other thimble and eye when everything is assembled on the boat.
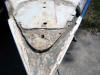
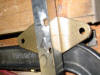
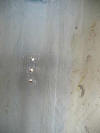
 Finally
today I built a base of thickened epoxy to conform to the curve of the
bobstay chainplate. As you can see in the photo, the curve of the chainplate
is slightly different than the curve of the bow. Finally
today I built a base of thickened epoxy to conform to the curve of the
bobstay chainplate. As you can see in the photo, the curve of the chainplate
is slightly different than the curve of the bow.
 So,
I taped around the chainplate base, thickened a small batch of epoxy,
and laid it over the area. The I covered the epoxy with some wax paper, and
pressed the base of the chainplate against the paper to create an exact
impression of the curve of the base. I let the impression dry until the
epoxy was in its sort of rubbery stage, and pulled off the wax paper and the
masking tape. I will clean up the edges tomorrow. So,
I taped around the chainplate base, thickened a small batch of epoxy,
and laid it over the area. The I covered the epoxy with some wax paper, and
pressed the base of the chainplate against the paper to create an exact
impression of the curve of the base. I let the impression dry until the
epoxy was in its sort of rubbery stage, and pulled off the wax paper and the
masking tape. I will clean up the edges tomorrow.
This evening after work I decided to install the bobstay backing block.
First, in order to align it with the holes I drilled, I waxed the thru bolts
carefully and inserted them into the holes. Then I mixed up a 5-pump batch
of epoxy, painted the inside of the bow--I had already roughed it up with
40-grit sandpaper and washed it in acetone. The boat was hot from being
closed up all day; about 85 degrees inside and the thin epoxy began to set
immediately. Then I thickened the rest to the consistency of peanut butter
and added it to an empty caulking tube. I mixed up two more batches the same
thickness and filled the tube.
On the boat, I laid down about a two inch thick
line of epoxy into the bow cavity and around the protruding bolts.
 Then, I
slipped the backing block down onto the bolts pressing it into the hot
mixture. I caulked around the sides, filling up the space between the
backing block and the sides of the hull. I used all the mixture and had to
make up another two batches to complete the fillets. The epoxy started
kicking immediately and I drove out the bolts from inside with a wooden
dowel. I baby sat the mix with a spray bottle of water just in case it
started to smoke, but it didn't. The coolness of the thick hull acted as a
heat sink and pulled the heat away from the mix. In an hour it had started
to cool and was hard. Then, I
slipped the backing block down onto the bolts pressing it into the hot
mixture. I caulked around the sides, filling up the space between the
backing block and the sides of the hull. I used all the mixture and had to
make up another two batches to complete the fillets. The epoxy started
kicking immediately and I drove out the bolts from inside with a wooden
dowel. I baby sat the mix with a spray bottle of water just in case it
started to smoke, but it didn't. The coolness of the thick hull acted as a
heat sink and pulled the heat away from the mix. In an hour it had started
to cool and was hard.
 The
following week I added two layers of 6 oz. cloth and two of 24 oz roving.
With a coat of the System Three epoxy primer, I re-drilled the holes from the
outside. Then I began work on the stainless backing plate. The
following week I added two layers of 6 oz. cloth and two of 24 oz roving.
With a coat of the System Three epoxy primer, I re-drilled the holes from the
outside. Then I began work on the stainless backing plate.
Finishing the Bobstay Chainplate
Today I finished the final steps to the inside
of the chain locker. I took the stainless steel stock that I received from
metalsdepot.com
(McMaster's kept sending me ferrous steel instead of stainless and I finally
looked elsewhere--and metalsdepot.com had 304 stainless stock for a third of
what McMaster sold their "stainless" to me for)
 and
drilled it for the bobstay bolts and for the turnbuckle that will attach it
to the backing plate for the inner forestay chainplate, I mounted it in the
bow to measure the length of the stainless wire that connects to the backing
plate for the inner forestay chainplate. and
drilled it for the bobstay bolts and for the turnbuckle that will attach it
to the backing plate for the inner forestay chainplate, I mounted it in the
bow to measure the length of the stainless wire that connects to the backing
plate for the inner forestay chainplate.
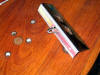
 Then,
I cut the wire to proper length and nicopressed the second thimble to it.
The final assembly looks like this: Then,
I cut the wire to proper length and nicopressed the second thimble to it.
The final assembly looks like this:
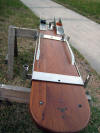
Mounting the New Bowsprit
 With
the help of my brother John, we test mounted the new bowsprit. I used two
simple Spanish windlasses to secure it and align it to the centerline of the
deck. With
the help of my brother John, we test mounted the new bowsprit. I used two
simple Spanish windlasses to secure it and align it to the centerline of the
deck.
 Then
I drilled the center mounting hole thru the deck and backing plate. After
the sprit was bolted in place, I drilled the two side mounting holes and the
four holes for the inner forestay chainplate. I took it off the following
day and taped over the holes. I still need to gouge out the deck core and
fill them solid with epoxy, but aside from that small step, the new 50-year
bowsprit is finished. Then
I drilled the center mounting hole thru the deck and backing plate. After
the sprit was bolted in place, I drilled the two side mounting holes and the
four holes for the inner forestay chainplate. I took it off the following
day and taped over the holes. I still need to gouge out the deck core and
fill them solid with epoxy, but aside from that small step, the new 50-year
bowsprit is finished.
Once I test fit the bowsprit, I
finished adding epoxy coats to both sides (3 coats on each) and I added
three coats of System Three LPU Clear Gloss with the cross linked hardener.
 I
then mounted the bowsprit in the stainless surround and taped off the
parameter so I could add two additional coats of the LPU clear mixed with
nonskid grit. I used the same procedure as I used to add the non-skid to the
top of the seahood. I used a small roller and rolled it on. It's easy to do
and both very non-skid and very permanent. I
then mounted the bowsprit in the stainless surround and taped off the
parameter so I could add two additional coats of the LPU clear mixed with
nonskid grit. I used the same procedure as I used to add the non-skid to the
top of the seahood. I used a small roller and rolled it on. It's easy to do
and both very non-skid and very permanent.
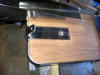
 Here
is the finished nonskid. Here
is the finished nonskid.
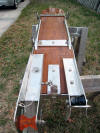 It
has a slight white appearance but more importantly it will keep me on the
bowsprit. It
has a slight white appearance but more importantly it will keep me on the
bowsprit.
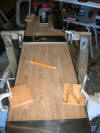
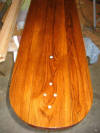
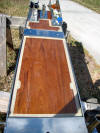
 Here
is the underside of the bowsprit--just as beautiful. Here
is the underside of the bowsprit--just as beautiful.
|